> ## Documentation Index
> Fetch the complete documentation index at: https://docs.flipt.io/llms.txt
> Use this file to discover all available pages before exploring further.
# Git SCM Integration
> Configure Flipt v2 to allow deeper integration with your Git Provider
Flipt v2 supports Source Control Management (SCM) for Git repositories.
This functionality is only available in Flipt v2 Pro. [Learn
more](/v2/licensing) about our commercial license or purchase a
[monthly](https://getflipt.co/pro/monthly) or
[annual](https://getflipt.co/pro/annual) license.
## Prerequisites
* [Flipt v2](/v2/quickstart)
* A Flipt v2 environment configured with [Git Sync](/v2/guides/operations/environments/git-sync)
* A Flipt v2 Pro license or trial license
Flipt v2 SCM integration supports most of the major Git providers including
GitHub, GitLab, Bitbucket, Gitea, and Azure DevOps.
## 1. Configure SCM Integration
This section will walk you through configuring Flipt v2 to more deeply integrate with your Git provider to enable features like [Merge Proposals](/v2/introduction#merge-proposals).
## GitHub Integration
### 1. Create a Personal Access Token (PAT)
1. Go to [GitHub Settings > Developer settings > Personal access tokens](https://github.com/settings/tokens).
2. Click **"Generate new token"**
3. Give your token a name
4. Select a resource owner (e.g. your organization)
5. Select the repositories you want to give access to (or Select all). These should be the same repositories that you have configured to [sync with Flipt](/v2/guides/operations/environments/git-sync).
6. Set an expiration date
7. Select the following repository scopes (**required**):
* `contents` read and write access
* `pull-requests` read and write access
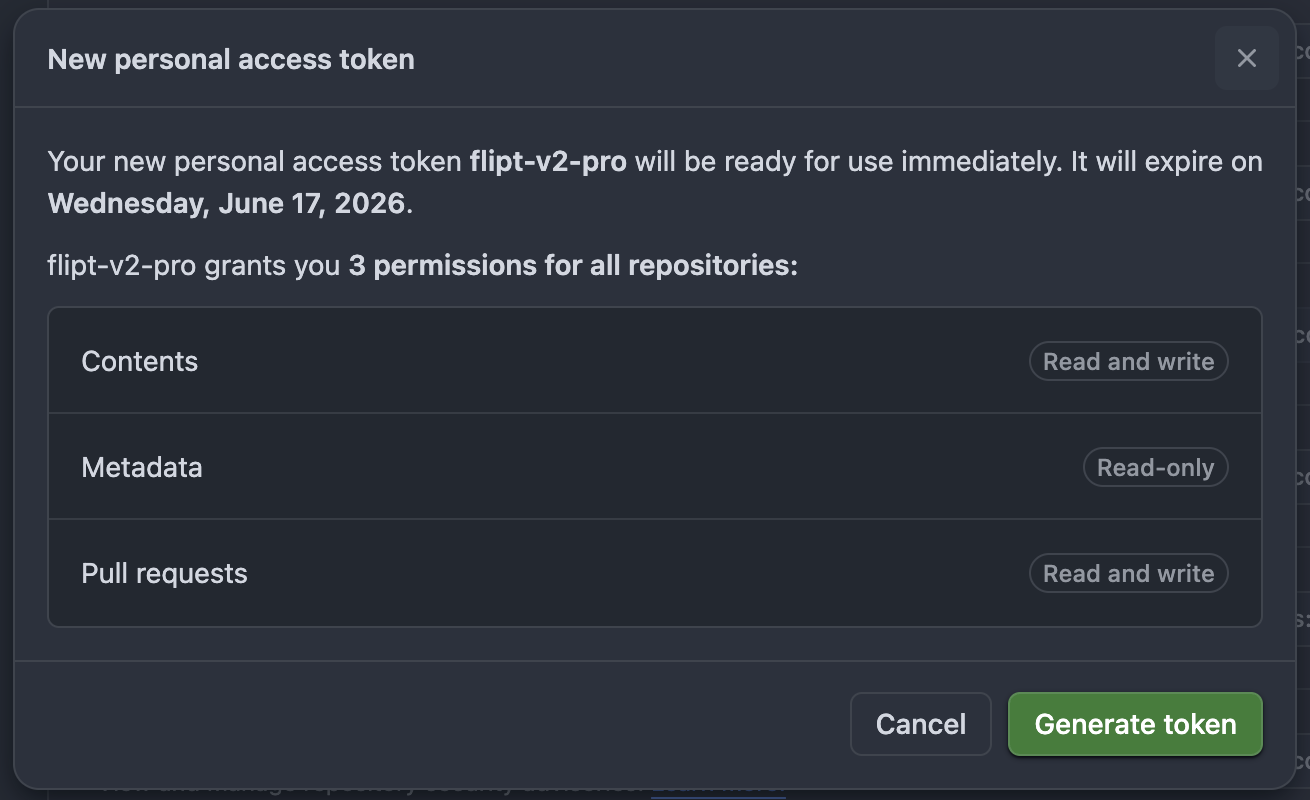 8. Click **"Generate token"** and copy the token. **You will not be able to see it again!**
### 2. Configure GitHub Credentials
Edit your Flipt configuration file to use the GitHub credentials you created in the previous step:
```yaml theme={null}
credentials:
github:
type: access_token
access_token:
```
### 3. Configure Flipt Storage with GitHub Remote
Edit your Flipt configuration file to add or update the storage backend that syncs with your GitHub repository:
```yaml theme={null}
storage:
github:
remote: "https://github.com//.git"
branch: "main"
poll_interval: "30s"
credentials: "github"
backend:
type: local
path: "/path/to/local/clone"
```
### 4. Configure an Environment to use GitHub SCM
Edit your Flipt configuration file to add or update the environment that uses the GitHub SCM storage backend and add the `scm` section:
```yaml highlight={6-8} theme={null}
environments:
production:
name: "Production"
storage: "github"
default: true
scm:
type: github
credentials: "github"
```
## Bitbucket Integration
### 1. Create API Token or App Password
**App passwords are being deprecated and will stop working in 2026.** We
strongly recommend using API tokens instead.
**Option A: API Token (Recommended for Bitbucket Cloud)**
1. Go to [Bitbucket Account Settings > API tokens](https://bitbucket.org/account/settings/api-tokens/)
2. Click **"Create API token"**
3. Give your token a name
4. Select the following scopes (**required**):
* Repositories: Read, Write
* Pull requests: Read, Write
5. Click **"Create"** and copy the generated token. **You will not be able to see it again!**
**Option B: App Password (Legacy - Not recommended)**
Only use app passwords if API tokens are not available. **App passwords will
be deprecated on September 9, 2025 and will stop working on June 9, 2026.**
1. Go to [Bitbucket Account Settings > App passwords](https://bitbucket.org/account/settings/app-passwords/)
2. Click **"Create app password"**
3. Give your app password a name
4. Select the following permissions (**required**):
* Repositories: Read, Write
* Pull requests: Read, Write
5. Click **"Create"** and copy the generated password. **You will not be able to see it again!**
**Option C: Access Token (For Bitbucket Server/Data Center)**
1. Go to your Bitbucket Server settings
2. Navigate to Personal access tokens
3. Create a new token with repository and pull request permissions
### 2. Configure Bitbucket Credentials
Edit your Flipt configuration file to use the Bitbucket credentials:
**Using API Token (Recommended):**
```yaml theme={null}
credentials:
bitbucket:
type: access_token
access_token:
```
**Using App Password (Legacy):**
```yaml theme={null}
credentials:
bitbucket:
type: basic
basic:
username:
password:
```
**Using Access Token (Bitbucket Server/Data Center):**
```yaml theme={null}
credentials:
bitbucket:
type: access_token
access_token:
```
### 3. Configure Flipt Storage with Bitbucket Remote
Edit your Flipt configuration file to add or update the storage backend that syncs with your Bitbucket repository:
```yaml theme={null}
storage:
bitbucket:
remote: "https://bitbucket.org//.git"
branch: "main"
poll_interval: "30s"
credentials: "bitbucket"
backend:
type: local
path: "/path/to/local/clone"
```
### 4. Configure an Environment to use Bitbucket SCM
Edit your Flipt configuration file to add or update the environment that uses the Bitbucket SCM storage backend and add the `scm` section:
```yaml highlight={6-8} theme={null}
environments:
production:
name: "Production"
storage: "bitbucket"
default: true
scm:
type: bitbucket
credentials: "bitbucket"
```
**For Bitbucket Server (Custom Instance):**
```yaml highlight={6-9} theme={null}
environments:
production:
name: "Production"
storage: "bitbucket"
default: true
scm:
type: bitbucket
api_url: "https://bitbucket.company.com/api/v2.0"
credentials: "bitbucket"
```
## Azure DevOps Integration
### 1. Create a Personal Access Token (PAT)
1. Go to your Azure DevOps organization (e.g., `https://dev.azure.com/{your-organization}`)
2. Click on your profile picture in the top right corner
3. Select **"Personal access tokens"**
4. Click **"New Token"**
5. Give your token a name and set an expiration date
6. Select the organization and scope:
* **Code (read & write)** - Required for repository access
* **Pull Request (read & write)** - Required for merge proposals
7. Click **"Create"** and copy the token. **You will not be able to see it again!**
### 2. Configure Azure DevOps Credentials
Edit your Flipt configuration file to use the Azure DevOps credentials:
```yaml theme={null}
credentials:
azure:
type: basic
basic:
username:
password:
```
### 3. Configure Flipt Storage with Azure DevOps Remote
Edit your Flipt configuration file to add or update the storage backend that syncs with your Azure DevOps repository:
```yaml theme={null}
storage:
azure:
remote: "https://dev.azure.com///_git/"
branch: "main"
poll_interval: "30s"
credentials: "azure"
backend:
type: local
path: "/path/to/local/clone"
```
### 4. Configure an Environment to use Azure DevOps SCM
Edit your Flipt configuration file to add or update the environment that uses the Azure DevOps SCM storage backend:
```yaml highlight={6-8} theme={null}
environments:
production:
name: "Production"
storage: "azure"
default: true
scm:
type: azure
credentials: "azure"
```
**For Azure DevOps Server (On-premises):**
```yaml highlight={6-9} theme={null}
environments:
production:
name: "Production"
storage: "azure"
default: true
scm:
type: azure
api_url: "https://your-server/tfs/{collection}/_apis"
credentials: "azure"
```
## GitLab Integration
### 1. Create a Personal Access Token (PAT)
1. Go to [GitLab Settings > Access Tokens](https://gitlab.com/-/user_settings/personal_access_tokens) (or your GitLab instance)
2. Click **"Add new token"**
3. Give your token a name
4. Set an expiration date (optional but recommended)
5. Select the following scopes (**required**):
* `api` - Full access to the API
* `read_repository` - Read access to repositories
* `write_repository` - Write access to repositories
6. Click **"Create personal access token"** and copy the token. **You will not be able to see it again!**
### 2. Configure GitLab Credentials
Edit your Flipt configuration file to use the GitLab credentials:
```yaml theme={null}
credentials:
gitlab:
type: access_token
access_token:
```
### 3. Configure Flipt Storage with GitLab Remote
Edit your Flipt configuration file to add or update the storage backend that syncs with your GitLab repository:
```yaml theme={null}
storage:
gitlab:
remote: "https://gitlab.com//.git"
branch: "main"
poll_interval: "30s"
credentials: "gitlab"
backend:
type: local
path: "/path/to/local/clone"
```
### 4. Configure an Environment to use GitLab SCM
Edit your Flipt configuration file to add or update the environment that uses the GitLab SCM storage backend:
```yaml highlight={6-8} theme={null}
environments:
production:
name: "Production"
storage: "gitlab"
default: true
scm:
type: gitlab
credentials: "gitlab"
```
**For GitLab Self-Managed (Self-hosted):**
```yaml highlight={6-9} theme={null}
environments:
production:
name: "Production"
storage: "gitlab"
default: true
scm:
type: gitlab
api_url: "https://gitlab.company.com/api/v4"
credentials: "gitlab"
```
## 2. Start Flipt
Start or restart your Flipt server with the updated configuration. Flipt will now:
* Clone your Git repository to the specified local path
* Periodically sync flag state to and from your Git provider
* Commit and push changes when you update flags via the Flipt API or UI
* Enable merge proposals in the Flipt UI
8. Click **"Generate token"** and copy the token. **You will not be able to see it again!**
### 2. Configure GitHub Credentials
Edit your Flipt configuration file to use the GitHub credentials you created in the previous step:
```yaml theme={null}
credentials:
github:
type: access_token
access_token:
```
### 3. Configure Flipt Storage with GitHub Remote
Edit your Flipt configuration file to add or update the storage backend that syncs with your GitHub repository:
```yaml theme={null}
storage:
github:
remote: "https://github.com//.git"
branch: "main"
poll_interval: "30s"
credentials: "github"
backend:
type: local
path: "/path/to/local/clone"
```
### 4. Configure an Environment to use GitHub SCM
Edit your Flipt configuration file to add or update the environment that uses the GitHub SCM storage backend and add the `scm` section:
```yaml highlight={6-8} theme={null}
environments:
production:
name: "Production"
storage: "github"
default: true
scm:
type: github
credentials: "github"
```
## Bitbucket Integration
### 1. Create API Token or App Password
**App passwords are being deprecated and will stop working in 2026.** We
strongly recommend using API tokens instead.
**Option A: API Token (Recommended for Bitbucket Cloud)**
1. Go to [Bitbucket Account Settings > API tokens](https://bitbucket.org/account/settings/api-tokens/)
2. Click **"Create API token"**
3. Give your token a name
4. Select the following scopes (**required**):
* Repositories: Read, Write
* Pull requests: Read, Write
5. Click **"Create"** and copy the generated token. **You will not be able to see it again!**
**Option B: App Password (Legacy - Not recommended)**
Only use app passwords if API tokens are not available. **App passwords will
be deprecated on September 9, 2025 and will stop working on June 9, 2026.**
1. Go to [Bitbucket Account Settings > App passwords](https://bitbucket.org/account/settings/app-passwords/)
2. Click **"Create app password"**
3. Give your app password a name
4. Select the following permissions (**required**):
* Repositories: Read, Write
* Pull requests: Read, Write
5. Click **"Create"** and copy the generated password. **You will not be able to see it again!**
**Option C: Access Token (For Bitbucket Server/Data Center)**
1. Go to your Bitbucket Server settings
2. Navigate to Personal access tokens
3. Create a new token with repository and pull request permissions
### 2. Configure Bitbucket Credentials
Edit your Flipt configuration file to use the Bitbucket credentials:
**Using API Token (Recommended):**
```yaml theme={null}
credentials:
bitbucket:
type: access_token
access_token:
```
**Using App Password (Legacy):**
```yaml theme={null}
credentials:
bitbucket:
type: basic
basic:
username:
password:
```
**Using Access Token (Bitbucket Server/Data Center):**
```yaml theme={null}
credentials:
bitbucket:
type: access_token
access_token:
```
### 3. Configure Flipt Storage with Bitbucket Remote
Edit your Flipt configuration file to add or update the storage backend that syncs with your Bitbucket repository:
```yaml theme={null}
storage:
bitbucket:
remote: "https://bitbucket.org//.git"
branch: "main"
poll_interval: "30s"
credentials: "bitbucket"
backend:
type: local
path: "/path/to/local/clone"
```
### 4. Configure an Environment to use Bitbucket SCM
Edit your Flipt configuration file to add or update the environment that uses the Bitbucket SCM storage backend and add the `scm` section:
```yaml highlight={6-8} theme={null}
environments:
production:
name: "Production"
storage: "bitbucket"
default: true
scm:
type: bitbucket
credentials: "bitbucket"
```
**For Bitbucket Server (Custom Instance):**
```yaml highlight={6-9} theme={null}
environments:
production:
name: "Production"
storage: "bitbucket"
default: true
scm:
type: bitbucket
api_url: "https://bitbucket.company.com/api/v2.0"
credentials: "bitbucket"
```
## Azure DevOps Integration
### 1. Create a Personal Access Token (PAT)
1. Go to your Azure DevOps organization (e.g., `https://dev.azure.com/{your-organization}`)
2. Click on your profile picture in the top right corner
3. Select **"Personal access tokens"**
4. Click **"New Token"**
5. Give your token a name and set an expiration date
6. Select the organization and scope:
* **Code (read & write)** - Required for repository access
* **Pull Request (read & write)** - Required for merge proposals
7. Click **"Create"** and copy the token. **You will not be able to see it again!**
### 2. Configure Azure DevOps Credentials
Edit your Flipt configuration file to use the Azure DevOps credentials:
```yaml theme={null}
credentials:
azure:
type: basic
basic:
username:
password:
```
### 3. Configure Flipt Storage with Azure DevOps Remote
Edit your Flipt configuration file to add or update the storage backend that syncs with your Azure DevOps repository:
```yaml theme={null}
storage:
azure:
remote: "https://dev.azure.com///_git/"
branch: "main"
poll_interval: "30s"
credentials: "azure"
backend:
type: local
path: "/path/to/local/clone"
```
### 4. Configure an Environment to use Azure DevOps SCM
Edit your Flipt configuration file to add or update the environment that uses the Azure DevOps SCM storage backend:
```yaml highlight={6-8} theme={null}
environments:
production:
name: "Production"
storage: "azure"
default: true
scm:
type: azure
credentials: "azure"
```
**For Azure DevOps Server (On-premises):**
```yaml highlight={6-9} theme={null}
environments:
production:
name: "Production"
storage: "azure"
default: true
scm:
type: azure
api_url: "https://your-server/tfs/{collection}/_apis"
credentials: "azure"
```
## GitLab Integration
### 1. Create a Personal Access Token (PAT)
1. Go to [GitLab Settings > Access Tokens](https://gitlab.com/-/user_settings/personal_access_tokens) (or your GitLab instance)
2. Click **"Add new token"**
3. Give your token a name
4. Set an expiration date (optional but recommended)
5. Select the following scopes (**required**):
* `api` - Full access to the API
* `read_repository` - Read access to repositories
* `write_repository` - Write access to repositories
6. Click **"Create personal access token"** and copy the token. **You will not be able to see it again!**
### 2. Configure GitLab Credentials
Edit your Flipt configuration file to use the GitLab credentials:
```yaml theme={null}
credentials:
gitlab:
type: access_token
access_token:
```
### 3. Configure Flipt Storage with GitLab Remote
Edit your Flipt configuration file to add or update the storage backend that syncs with your GitLab repository:
```yaml theme={null}
storage:
gitlab:
remote: "https://gitlab.com//.git"
branch: "main"
poll_interval: "30s"
credentials: "gitlab"
backend:
type: local
path: "/path/to/local/clone"
```
### 4. Configure an Environment to use GitLab SCM
Edit your Flipt configuration file to add or update the environment that uses the GitLab SCM storage backend:
```yaml highlight={6-8} theme={null}
environments:
production:
name: "Production"
storage: "gitlab"
default: true
scm:
type: gitlab
credentials: "gitlab"
```
**For GitLab Self-Managed (Self-hosted):**
```yaml highlight={6-9} theme={null}
environments:
production:
name: "Production"
storage: "gitlab"
default: true
scm:
type: gitlab
api_url: "https://gitlab.company.com/api/v4"
credentials: "gitlab"
```
## 2. Start Flipt
Start or restart your Flipt server with the updated configuration. Flipt will now:
* Clone your Git repository to the specified local path
* Periodically sync flag state to and from your Git provider
* Commit and push changes when you update flags via the Flipt API or UI
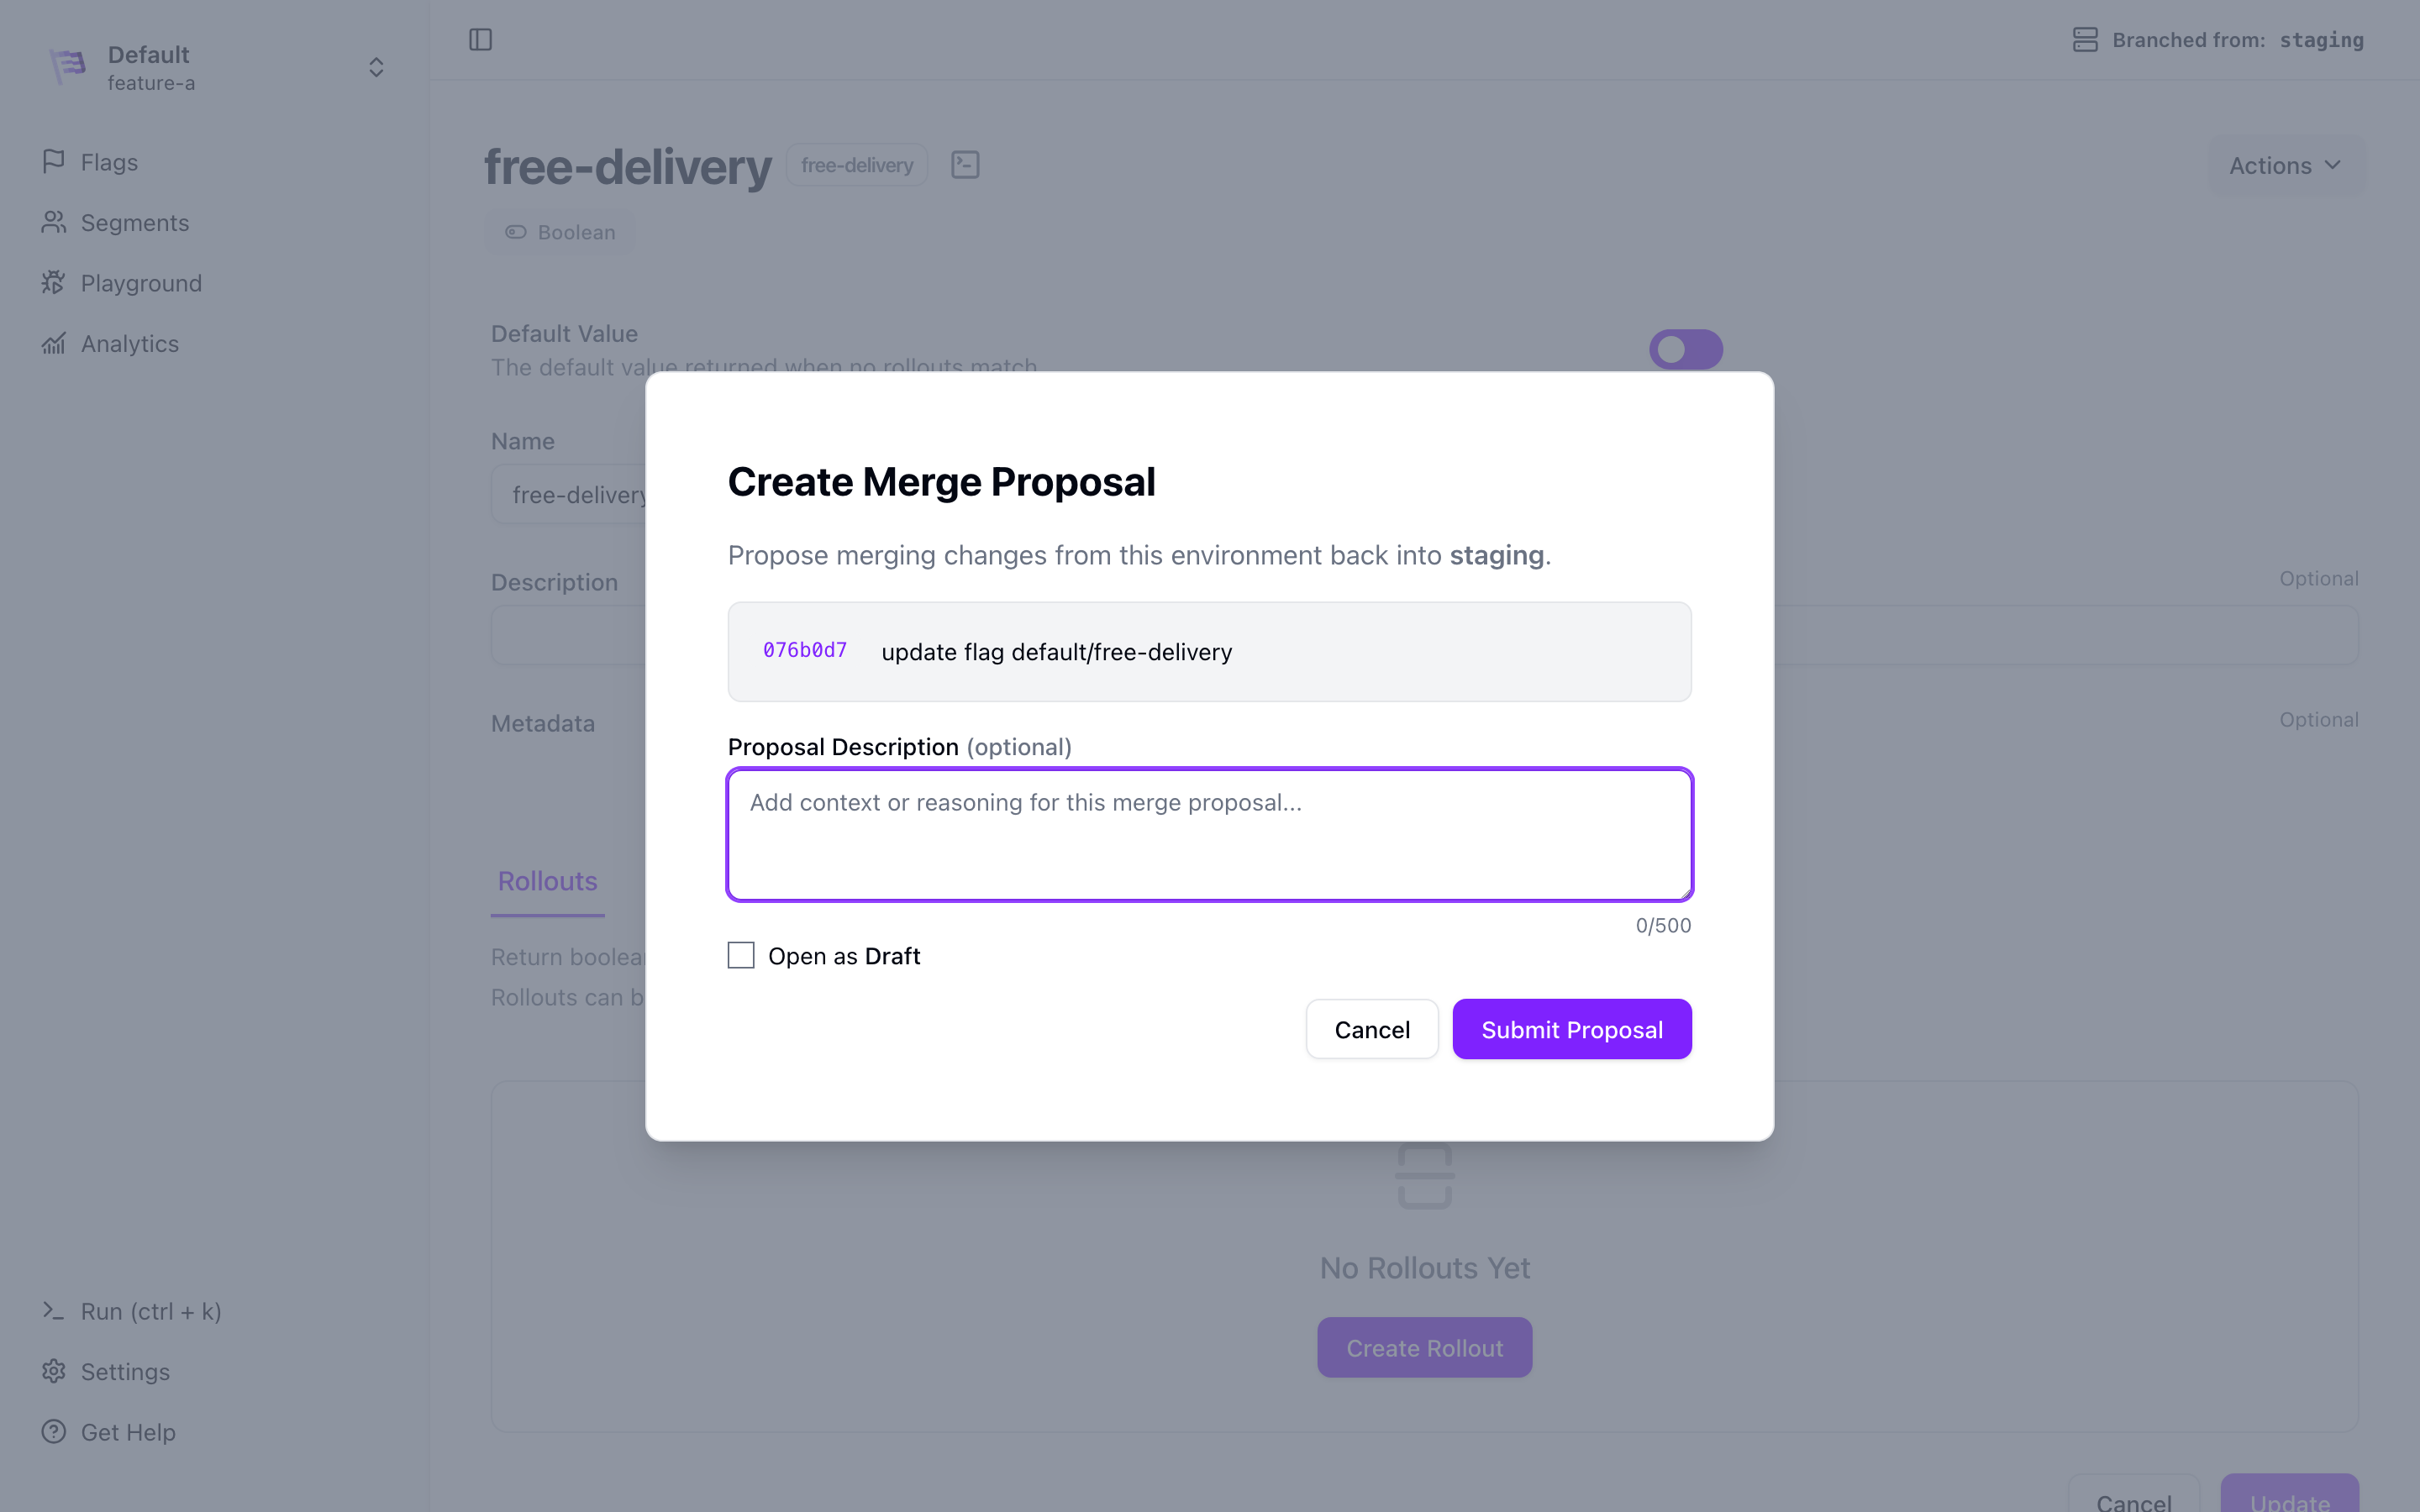
* Enable merge proposals in the Flipt UI
 ## 3. Troubleshooting
### Common Issues
* **Authentication**: Ensure your credentials (PAT, API token, or app password) have the correct permissions and haven't expired
* **Permissions**: Make sure the local path is writable by the Flipt process
* **Logs**: Check Flipt logs for any sync or authentication errors
* **Network**: For self-hosted instances, verify the API URL is correct and accessible
### Provider-Specific Troubleshooting
**GitHub:**
* Ensure your PAT has the correct repository scopes (`contents` and `pull-requests`)
* Verify the repository URL format: `https://github.com/{owner}/{repo}.git`
**Bitbucket:**
* For API tokens: Ensure you have `Repositories: Read, Write` and `Pull requests: Read, Write` scopes
* For app passwords: Note that they will be deprecated in September 2025
* For Bitbucket Server/Data Center: Verify the API URL format (typically `/api/v2.0`)
**Azure DevOps:**
* Ensure your PAT has `Code (read & write)` and `Pull Request (read & write)` scopes
* Verify the repository URL format: `https://dev.azure.com/{org}/{project}/_git/{repo}`
* For Azure DevOps Server: Verify the API URL format: `https://your-server/tfs/{collection}/_apis`
**GitLab:**
* Ensure your PAT has the correct scopes: `api`, `read_repository`, `write_repository`
* For GitLab Self-Managed: Verify the API URL is correct (typically `/api/v4`)
* Verify the repository URL format: `https://gitlab.com/{owner}/{repo}.git`
## Authentication Formats by Provider
Different Git providers require different authentication formats for optimal compatibility:
| Provider | Recommended Auth Method | Basic Auth Format | Notes |
| ---------------- | ----------------------- | --------------------------------------- | ---------------------------------- |
| **GitHub** | Personal Access Token | Username: token, Password: (empty) | |
| **GitLab** | Personal Access Token | Username: oauth2, Password: token | |
| **Bitbucket** | API Token | Username: (not used), Token: api\_token | App passwords deprecated Sept 2025 |
| **Azure DevOps** | Personal Access Token | Username: username, Password: PAT | |
| **Gitea** | Personal Access Token | Username: token, Password: (empty) | |
## Conclusion
This guide showed how to configure Flipt to enable merge proposals in the Flipt UI.
You can now use Flipt to manage your flags and use merge proposals to review and approve changes to your flags.
If you have any questions or feedback, please reach out to the Flipt team on [Discord](https://discord.gg/flipt) or [GitHub Discussions](https://github.com/flipt-io/flipt/discussions).
***
**References:**
* [Flipt v2 Environments Configuration](/v2/configuration/environments)
* [Flipt v2 Git Sync](/v2/guides/operations/environments/git-sync)
* [Flipt v2 Merge Proposals](/v2/introduction#merge-proposals)
* [GitHub: Creating a personal access token](https://docs.github.com/en/authentication/keeping-your-account-and-data-secure/creating-a-personal-access-token)
## 3. Troubleshooting
### Common Issues
* **Authentication**: Ensure your credentials (PAT, API token, or app password) have the correct permissions and haven't expired
* **Permissions**: Make sure the local path is writable by the Flipt process
* **Logs**: Check Flipt logs for any sync or authentication errors
* **Network**: For self-hosted instances, verify the API URL is correct and accessible
### Provider-Specific Troubleshooting
**GitHub:**
* Ensure your PAT has the correct repository scopes (`contents` and `pull-requests`)
* Verify the repository URL format: `https://github.com/{owner}/{repo}.git`
**Bitbucket:**
* For API tokens: Ensure you have `Repositories: Read, Write` and `Pull requests: Read, Write` scopes
* For app passwords: Note that they will be deprecated in September 2025
* For Bitbucket Server/Data Center: Verify the API URL format (typically `/api/v2.0`)
**Azure DevOps:**
* Ensure your PAT has `Code (read & write)` and `Pull Request (read & write)` scopes
* Verify the repository URL format: `https://dev.azure.com/{org}/{project}/_git/{repo}`
* For Azure DevOps Server: Verify the API URL format: `https://your-server/tfs/{collection}/_apis`
**GitLab:**
* Ensure your PAT has the correct scopes: `api`, `read_repository`, `write_repository`
* For GitLab Self-Managed: Verify the API URL is correct (typically `/api/v4`)
* Verify the repository URL format: `https://gitlab.com/{owner}/{repo}.git`
## Authentication Formats by Provider
Different Git providers require different authentication formats for optimal compatibility:
| Provider | Recommended Auth Method | Basic Auth Format | Notes |
| ---------------- | ----------------------- | --------------------------------------- | ---------------------------------- |
| **GitHub** | Personal Access Token | Username: token, Password: (empty) | |
| **GitLab** | Personal Access Token | Username: oauth2, Password: token | |
| **Bitbucket** | API Token | Username: (not used), Token: api\_token | App passwords deprecated Sept 2025 |
| **Azure DevOps** | Personal Access Token | Username: username, Password: PAT | |
| **Gitea** | Personal Access Token | Username: token, Password: (empty) | |
## Conclusion
This guide showed how to configure Flipt to enable merge proposals in the Flipt UI.
You can now use Flipt to manage your flags and use merge proposals to review and approve changes to your flags.
If you have any questions or feedback, please reach out to the Flipt team on [Discord](https://discord.gg/flipt) or [GitHub Discussions](https://github.com/flipt-io/flipt/discussions).
***
**References:**
* [Flipt v2 Environments Configuration](/v2/configuration/environments)
* [Flipt v2 Git Sync](/v2/guides/operations/environments/git-sync)
* [Flipt v2 Merge Proposals](/v2/introduction#merge-proposals)
* [GitHub: Creating a personal access token](https://docs.github.com/en/authentication/keeping-your-account-and-data-secure/creating-a-personal-access-token)